Welcome to AlexaMirror
Alexa is my MagicMirror alexa enabled attempt.It took me several weeks to develop and today I bring it to you in a short and easy way, I hope. Well I’m only 15 I’m just leaving the shell.
This only works on raspberry pi!
“Alexa” enabled MagicMirror
Thanks to @MichMich first and the alexa team, for developing such a great software growing every day!. You can see their work here(It is crucial on this project).You will not need any kind of button instalation,you will be able to just say “alexa” + “command”
What you need to do.
Open a terminal and type
curl -sL https://raw.githubusercontent.com/elblogbruno/AlexaMirror/master/installscript21.sh | bash
When alexa installation starts follow this steps(they’ve been took from alexa avs sample app wiki):
Step 1: Register for an Amazon developer account
Unless you already have one, go ahead and create a free developer account at developer.amazon.com. You should review the AVS Terms and Agreements here.

Step 2: Create a device and security profile
Follow the steps here to register your product and create a security profile.
Make note of the following parameters. You’ll need these in Step 5 below.
ProductID (also known as Device Type ID),
ClientID, and
ClientSecret
Important: Make sure your Allowed Origins and Allowed Return URLs are set under Security Profile > Web Settings (see Create a device and security profile):

Step 3: Update the install script with your credentials
Before you run the install script, you need to update the script with the credentials that you got in step 3 - ProductID, ClientID, ClientSecret.

Paste the values for ProductID, ClientID, and ClientSecret that you got from Step 2 above.
The changes should look like this:
ProductID="RaspberryPi3"
ClientID="amzn.xxxxx.xxxxxxxxx"
ClientSecret="4e8cb14xxxxxxxxxxxxxxxxxxxxxxxxxxxxx6b4f9"
Type ctrl-X and then Y, and then press Enter to save the changes to the file and press space on my little script to follow the installation.
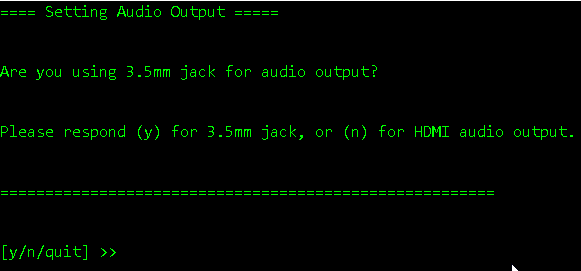
When you arrive to that part of the installation,you can choose between using hdmi output for sound or speakers conected to the 3.5 mm jack output
When you arrive to that part,you need to follow some easy steps so you are sure alexa is working perfectly.(Again I’ve took it out from alexa-avs-sample-app wiki)

Step 1: Run your web service, sample app and wake word engine
Now that installation is complete, you’ll need to run three commands in 3 separate terminal windows:
Terminal Window 1: to run the web service for authorization
Terminal Window 2: to run the sample app to communicate with AVS
Terminal Window 3: to run the wake word engine which allows you to start an interaction using the phrase "Alexa".
Note: These commands must be run in order.
Terminal Window 1
Open a new terminal window and type the following commands to bring up the web service which is used to authorize your sample app with AVS:
cd ~/AlexaMirror/alexa-avs-sample-app/samples
cd companionService && npm start


The server is now running on port 3000 and you are ready to start the client.
Terminal Window 2
Open a new terminal window and type the following commands to run the sample app, which communicates with AVS:
cd ~/Desktop/alexa-avs-sample-app/samples
cd javaclient && mvn exec:exec

Let’s walk through the next few steps relevant to Window 2.
When you run the client, a window should pop up with a message that says -
Please register your device by visiting the following URL in a web browser and following the instructions: https://localhost:3000/provision/d340f629bd685deeff28a917. Would you like to open the URL automatically in your default browser?

Click on “Yes” to open the URL in your default browser.
If you’re running Raspbian Jessie with Pixel desktop (and with Chromium browser), you may get a warning from the browser. You can get around it by clicking on Advanced -> Proceed to localhost(unsafe).


You’ll be taken to a Login with Amazon web page. Enter your Amazon credentials.And click on keep me signed and allow chromium to remember your credentials(it’s very important)

You’ll be taken to a Dev Authorization page, confirming that you’d like your device to access the Security Profile created earlier.

Click Okay.
You will now be redirected to a URL beginning with https://localhost:3000/authresponse followed by a query string. The body of the web page will say device tokens ready.

Return to the Java application and click the OK button. The client is now ready to accept Alexa requests.


Terminal Window 3
This project supports two third-party wake word engines: Sensory’s TrulyHandsFree and KITT.AI’s Snowboy. The -e parameter is used to select the agent and supports two values for : kitt_ai and sensory.
Open a new terminal window and use the following commands to bring up a wake word engine from Sensory or KITT.AI. The wake word engine will allow you to initiate interactions using the phrase “Alexa”.
To use the Sensory wake word engine, type -
cd ~/Desktop/alexa-avs-sample-app/samples
cd wakeWordAgent/src && ./wakeWordAgent -e sensory
or, type this to use KITT.AI’s wake word engine -
cd ~/Desktop/alexa-avs-sample-app/samples
cd wakeWordAgent/src && ./wakeWordAgent -e kitt_ai

Now you have a working hands-free AVS prototype!
Now click space on my script to follow the installation.
Support or Contact
Having trouble with AlexaMirror? You can sent me an email to elblogdebruno@outlook.es
Thanks a lot!